
Creating and maintaining different types of composts
Creating and maintaining different types of composts
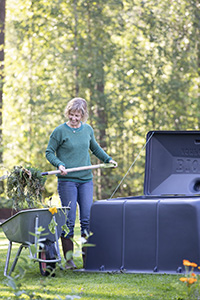
Compost heap
Locate the compost heap near to where the waste is created; by the vegetable plot or in the rear of the yard. The correct place for the compost is sheltered but not obscured. Do not create compost in a recess, which gathers water. If possible, keep the compost at the same location from year to year so as to always have earthworms and other decomposing organisms ready for work.
Lay, for example, chips, reeds or small branches on the bottom of the compost heap to ensure the air supply to the compost. Remember, however, that an airy bottom layer does not help, if you make the actual compost heap too dense. Compile the compost like a layered cake in slices about 5 cm thick, keeping in mind the three basic rules: looseness, humidity and nutrients. Lay in turns waste that is moist, rich in nitrogen and coarse, and rich in carbon.
Litter a few shovels of soil or old compost between the layers. These help compost to absorb moisture and bring the necessary micro-organisms into the compost. Add nitrogen to the garden compost by applying, for example, Compoststarter or Poultry Manure.
If the waste is dry, water the compost even while compiling the heap. A ready compost is difficult to water evenly. Make the compost heap sufficiently large to be able to continue burning. A suitable width for a compost heap is 1,5-2 m and a suitable height is 1-1,5 m The length of the heap can vary as required.
When the size of the compost is suitable, it is advisable to cover it by a soil or peat layer, about 10 cm thick. The peat layer reduces the evaporation of moisture and nutrients from the heap. As a final touch, you can still cover the heap with a hay or straw cover, about 10 cm thick, which keeps the compost warm for a long time.
The temperature in the compost can be observed using a compost thermometer fitted with a long stalk. If everything has been done correctly, the compost should warm up to at least +30 degrees Centigrade in a few days. If this is not the case, refer to the fault-finding diagram for reason.
If you put weeds in the compost, observe the following:
The seeds and roots of the weeds lose their germinability, if they are kept a few days in a compost, the temperature which is at least +55 degrees Centigrade. If the compost is not insulated, such temperature is only reached in the middle of the compost. Therefore, always bury the weeds in the centre of the compost, where the conditions are the hottest. To ensure the outcome, dry the weeds, for example, on a black plastic film, before putting them into a non-insulated compost.
Attending to the compost heap involves, above all, observing the humidity. In particular, in summer heat the compost may even require watering on a weekly basis.
A compost heap matures more quickly, if you turn it over once or twice a year. Easiest is to pile it on a new place next to the previous location. Turn the surface parts of the compost which have decomposed the least to the centre of the next heap, so that the composting will proceed smoothly. Water the compost if it looks dry.
- A compost heap matures in 1-3 years.
Garden Composter
Attending to a compost that consists of garden waste is easiest if you have two composters: you can leave one of the composts alone, while you fill the other one. Position the garden composter also in a sheltered place, where water is not gathered.
The Garden Composter is attended to in the same way as the compost heap. Start filling the composter by laying an airy bottom layer. Collect waste in the composter at the pace it is created in the garden, keeping in mind the three-part rule: looseness, humidity and nutrients. Pay special attention to the humidity of the compost. In particular, the edges of the compost tend to dry out.
It is advisable to turn over the contents of the composter once or twice a year to bring the non-decomposed edge-parts to the hottest place in the middle of the compost.
The contents of a Garden Composter usually freeze in winter. Freezing does not spoil the compost, but decomposing starts over in the spring as soon as the compost has melted. Snow should be shovelled around the Garden Composter for thermal insulation in winter. In spring, when the sun starts warming up, reactivate the compost by pouring a couple of bails of hot water into the compost and tossing
- In a Garden Composter garden, waste matures to compost soil in 1-2 years
Fast Composter
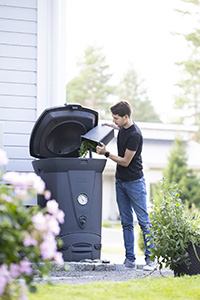 If you are composting household waste, acquire a proper composter with thermal insulation, intended for year-round composting of household waste. A household waste composter must always be hermetic against harmful animals and, if used throughout the year, thermo-insulated.
Such composter is, for example, the Biolan Composter 220
When choosing a composter for composting household waste, pay attention to the thermal insulation. The insulation thickness should be at least 5 cm so that composting will be successful even in the winter. The cover of the composter shall also be provided with decent insulation, because most of the heat evaporation happens through the cover.
In addition to thermal insulation also pay attention to the size of the composter; a too small composter will not be able to handle the waste created in the household, whereas a too large composter will not remain operational because the amount of waste accumulated is too small. If you only compost household waste, a composter of 200 litres will be sufficient for a family with four members.
Refer to the operating instructions of the household waste composter for the maintenance instructions of the respective composter model. These are general instructions for the use of a household waste composter
- Position the composter in a place sheltered against the wind, where it is convenient to take waste even in winter.
- Put onto the bottom of the composter a layer 5-10 cm thick of airy bedding, such as for example Biolan Komposti and Huussi Dry Bedding.
- Fill the composter at the pace waste is created in the yard and kitchen.
- It is important to use bedding while composting household waste. If possible, cover every portion of waste that you bring with a thin layer of bedding so the waste does not remain exposed on the surface to attract flies.
- Burning is quick in a household waste composter with thermal insulation and, therefore, the compost requires plenty of oxygen. Mix the compost in accordance with the instructions. In a detached house, tossing the compost once a month is sufficient. In housing companies where the accumulation of waste is more rapid, tossing may be required even once a week. Use of bedding and need of tossing are interrelated: the less you use bedding, the easier the compost packs up and requires tossing.
If the composter contains a lot of heat energy, the waste will be strongly compressed. In winter, if the build-up of waste is scarce, the temperature in the composter drops. This is not harmful to the compost. You can stimulate the compost in winter by pouring a small amount of hot water mixed with compoststarter in the topmost waste layer.
Waste composts quickly in a well-functioning household waste composter. For example, from a Biolan Fast Composter you can already empty compost in about 6-7 weeks.